Showing posts with label Learning. Show all posts

Sunday, May 17, 2015

Pottery therapy

Hi craft world.  I started a 10-week pottery class after a break up. Yes, it's a bit of a cliche, but one I would recommend to anyone. A full 3 -hour stretch once a week to just be absorbed in something to do with your hands, and enough to concentrate on without any real stress attached. All for $20 a class, plus clay.

I've learned a little bit about the nature of the clay, how it needs to be handled, and the wetness/dryness/ cracking behaviour. I've gone through the process of several weeks till you have a finished product - which has enforced patience and a certain letting go, because the results aren't always as expected, things crack and can't be finished, some glazes were faulty and didn't look right, etc. But overall it's been totally great. Low key chats with other people, some with a few terms of work, others just starting out.  A nice group dynamic emerges over 10 weeks and people are genuinely pleased to see each other's work emerge from the kilns and give you lots of positive feedback and exclamations.


I'm in my second term now, and have a new set of items which use decorating slip, before the first firing. I get to see them bisque fired next week and I'm very excited to see how they've turned out. I tried to take more care with these, as I'm learning how rushing the early stages means a bunch of little faults and imperfections later on.

If you are only going once a week - the stages are 1) moulding the wet clay (we started using rolled out pancakes of clay draped over moulds), 2) semi-drying in a plastic bag till its "leather hard", then doing finishing stuff like smoothing edges or punching holes, carving, etc  3) bisque fired so you can paint glazes on  4) ready to collect with glazes fired. Four weeks is the quickest this can happen but because it's a community centre, then they don't always get to fire everything every week so you can wait longer.  I like all the different tasks, and even the glazing which I didn't expect to! The layering weird colours is cool, but I get a bit indecisive over which of many different colour combos to try, because there's always a risk it will stuff up.Also - do I want lots of mis-matched items, thanks to wild colour experiments, or do I want o build up an earthy, ocean-y, brick-y, sandy kind of collection.
All the big questions.

There's wheels too, but I only had one go on them and have gone back to hand building. Wheels seemed to require more practice with zero out put, to just get the knack of throwing. And no  objects to hold and look at at the end. There's something to be said for the tactile.

Anyway, here's some pics from first term.
indents done with a banksia pod

stencil - worked well
failure - this lid sticks in the base, because of an indent in the clay.


Final platter combo. Still a bit more 'rustic' than I planned but, hey. And it's huge.


Monday, April 27, 2015

Stamp your feet stamp your hands stamp your everything

I've been inspired by other people's stamp making, after a few years of playing with mixed media art and seeing stamps that other people have made. I have a background of dabbling in printmaking, so if I'm honest, to begin with I was a bit snobby about making your own stamps. I thought they were the dumbed down version of relief printing. I also am a bit averse to using other people's stamps in my work because it doesn't feel like mine. I know some people use heaps of stamps and love them, and create great effects using them, I don't have any problem with that, it's just a personal preference for me. But anyway, to cut a long story short, I felt the need to try making some stamps, and around the same time I rediscovered a very soft, rubber carving plate I had bought for printmaking - and voila! the project was born.
To start with I used 'lino' and cut it into smallish squares, using standard lino cutting tools. Then I swapped to the rubber plate and cut that up, and oh my goodness, a world of difference. So much softer! My hands did not ache from the cutting! Quicker to do as well. I really really recommend not using lino if you want to make quick stamps. Another technique I've heard of is using just standard white erasers, which seems great - cheap and accessible, but perhaps limited to their standard sizes. I used a fairly standard and cheapish water based printmaking ink to prig with. Next round I'm gong to try gouache (because I have more colours in that) and slightly watered down acrylic to see how that goes. Once I got started on printing it was endlessly fun and I could have kept going for days, it was really very fun. You can see in the image below how the stamps came out on white, or Kraft brown recycled envelopes. I like both. In fact I still have the project materials out in my kitchen because I feel like 'any day now' I might whip up another batch of envelopes, or maybe some letter paper. As a bonus, I'm using a combination of these shapes to form my new logo for art therapy work (recently graduated). I thoroughly recommend stamping up a storm.

Tuesday, April 26, 2011

Mitts for Mother's Day

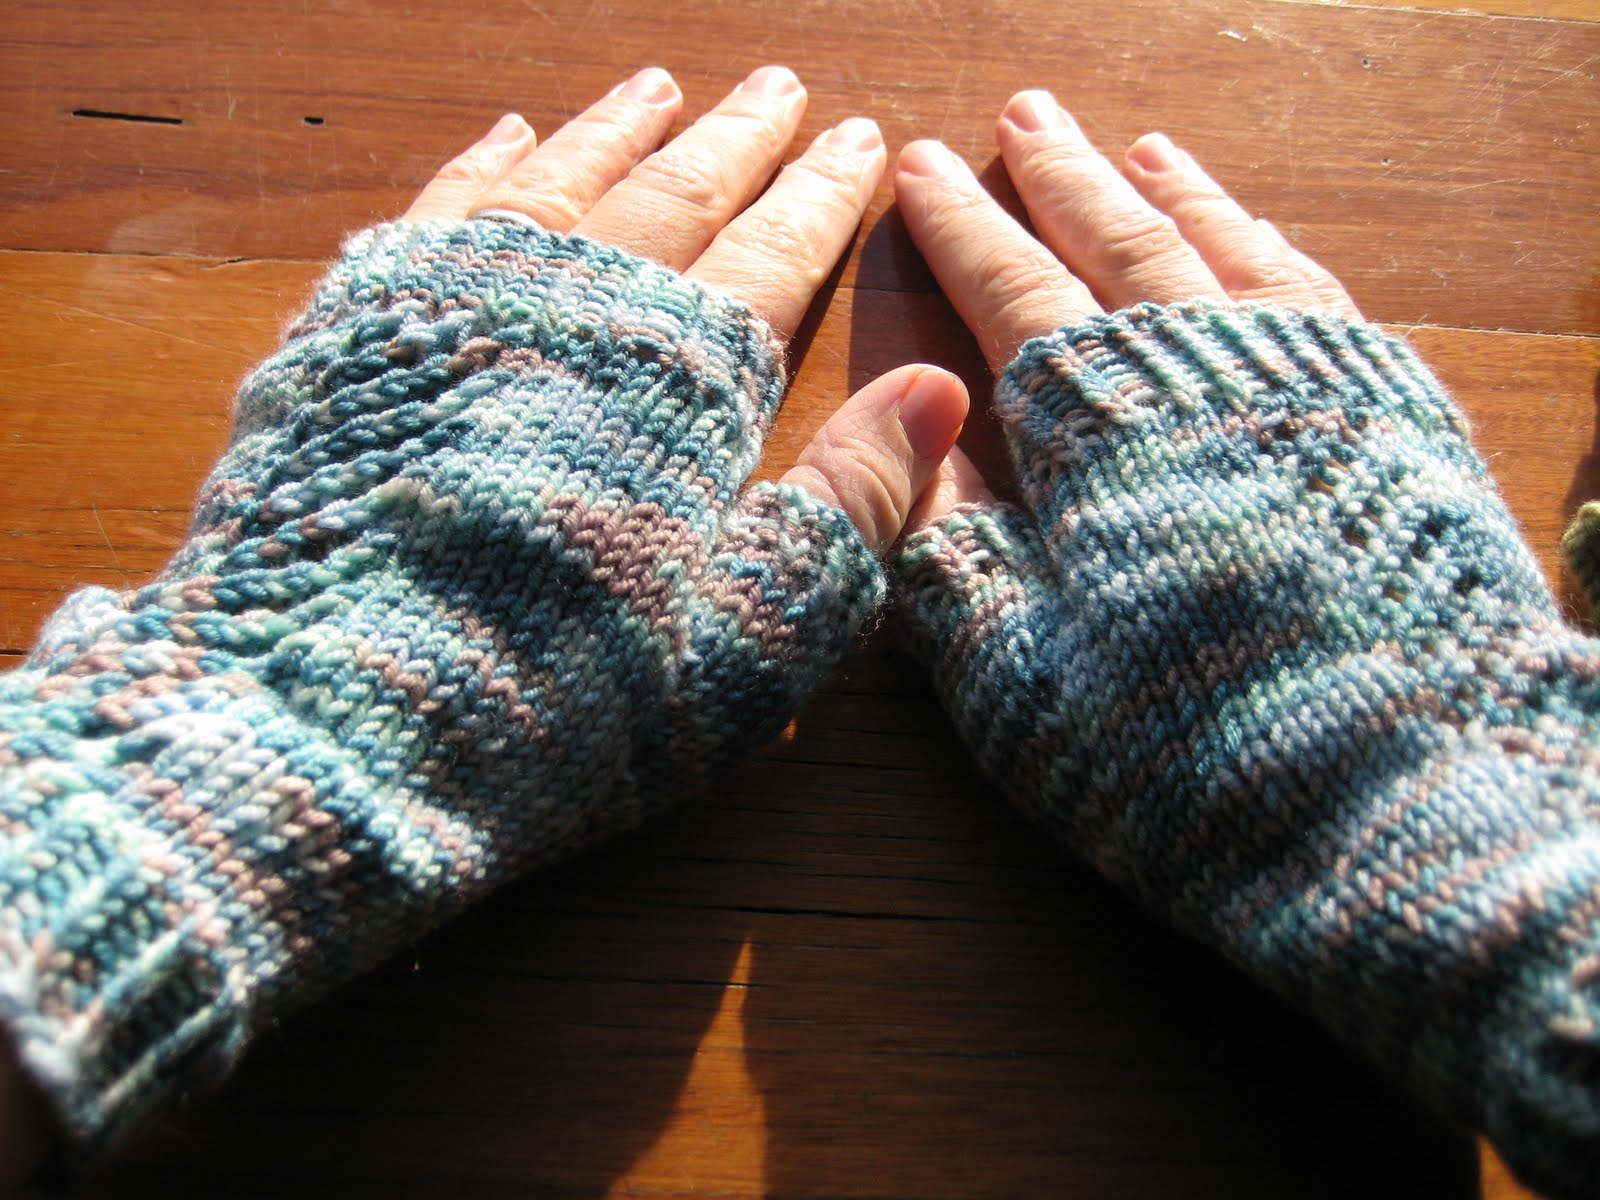
I've made fingerless mittens for both my mum and mother-in-law this year - these strike me as practical for cold weather when you need to actually do things with your hands. Given both these ladies are early birds and spend a bit of time at computers and handling books, and because I know they don't have these already, I decided to knit some mitts for this Mother's Day.

This first pair is for my Mum, using the Susie's Reading Mitts Pattern, and Ravelled here, and the second pair is for my Mother in Law, using the Garden Trellis Mitts pattern, and Ravelled here.

Both these projects have been great for learning new skills - basic lace, knitting fiddly bits with double pointed needles, and new stitches (twisted rib by knitting through back loop, old german cast-on). It's amazing the breadth of knitting (and crochet) tutorials that are now at your fingertips on YouTube and on the internet. Seek and

Monday, March 21, 2011

chugging to the finish(ed) line...

I'm making a zippered vest for my son, and it has pockets!. I've actually done a lot more than is in this photo. It's a fun project and it's teaching me lots of new skills - shaping arm holes, picking up and knitting, grafting, and generally just making up a garment from pieces - I've mostly knit in one piece in the round so far.

...and this tunic dress for my daughter:
Can't wait to get her in this! I just need to (learn to) crochet some button loops to finish the opening at the front. Part procrastination, part the fact that I need a smaller hook.
Finally, have started knitting my mother some study mitts, for mother's day:

I have done one, and need to do another. Again, this has been a bit of a learning process - learned the 3 needle bind-off, picot edge, and I shortened this when I accidentally made it too long in the wrist.

Saturday, January 30, 2010

New Bag


Went to a fun sewing workshop last weekend, in the mountains. My friend Mountainspice organised it (that is, invited me, booked us in) because we both love fabric and have grand plans for sewing but neither of us really learnt to sew or actually sew anything. She saw this advertised in the local free 'workshops a plenty' newspaper that they get up in the mountains.

We were a tad late because she picked me up from the train station and we made our way together. The workshop was held in a community centre, and the other (8 or so) women were already there and busy with their cutting and pinning when we got there. The teacher Fiona Warmbath is a dressmaker who runs regular workshops through the week, in fact most of the people there were regular attendees of her week day dressmaking classes.

We got to choose which bag to make, from 3 different designs. I went for a more 'handbag' style bag for myself, Mountainspice went for a shoulder tote style as a bookbag for her library-loving 3 year old.

I bought fabric the day before from the Fabric Store in Surry Hills, Sydney, with Miss Snapdragon's help choosing something extra groovy. I also raided my fabric suitcase (excavated from under the bed) to find cheery light coloured lining for MS's tote. Also waded through my button jar to find something large, decorative and lolly looking to finish it off.

Bag is lined with contrasting patterned fabric that you can only really see when diving in deep to find keys or other hiding things in the bag. Inside pocket got scrapped in an effort to get the bag finished in the confines of the workshop. I did end up staying after the official end time to get it done (a few people did) and I was truly exhausted after sewing for 6 hours after not having even said hello to my machine for well over a year but was super chuffed to have finished it at all, and the bag is now officially my very favourite handbag in the world. Like a kid with a macaroni necklace that's more loved than pearls, I love it extra much despite the wonky stitching and missing pocket or maybe even because of that.

Sunday, June 07, 2009

Creative winter workshops

Thought some of you might be interested in these. Sally is amazing, really patient and grounded, sets up a great space for play and remembering what's important to you. She has a background in art therapy but is also trained as a career counselor and is a practicing artist herself. Imagine her workshops would be a great way to refresh and refocus.

Treasure Maps
"Dare to dream. Care to collage. Create a picture of your heart's wishes. No art experience is necessary - just BYO (Bring Your Openness)"
Saturday morning 13th June
10am to 1pm in Glebe
$75 inc materials

Creative Flame
"What do you love doing? What ignites your spirit? How might you be light-arted?!
Spend a couple of mornings in a cosy, safe space playing with art materials and journalling. Create pictures to help sustain you through the heart of winter and beyond."
Saturday 25th and Sunday 26th July
10am to 1pm in Glebe
$150 inc materials.

Contact: Sally Swain
sally [at] artandsoul.cc
www.artandsoul.cc

Wednesday, July 30, 2008

Ducking and weaving


This is something I made at a conference I was at recently. They had a parallel session of basket weaving/textile arts - one woman had recently graduated from Charleas Darwin Uni in fine art and makes very contemporary pieces of jewellry, baskets and human and animal forms out of woven recycled plastics, yarn, sticks, washed up fishing nets etc. The other two women were Indigenous and using traditioning weaving techniques and natural fibres. This little piece I made is made from pandanas (palm) leaf, which was collected, torn using a thumb nail into strips and dyed using natural ochre and boiled in a billy can over coals by other people at the conference the day before I sat down to use them to weave with. The tricky bit was getting started - you have to make a little round bit in the middle (a bit like with crochet I think?)and then you keep making the same kind of stitch but binding on to the row before. You use a wide eyed darning type needle and need to keep the srands of fibre kind of moistened - not actually wet but just not so dry in the crackling heat of the sun that they start to break and fall apart. Filcking them with water or dipping your finger tips into a little saucer of water every so often seems to do the trick. I decided to make mine into a pendant to wear - which is why it has the little loop, to put a cord through. That was mostly because I knew that it would have taken me a whole extra day to get it to a basket size, and I didn't want a placemat. I love it a lot, and it reminds me of sitting on a tarp, under shade, next to women who I would otherwise have never met, being encouraged, seeing deft hands make short work of something that I struggled with, listening to Aboriginal languages being spoken, hearing noise in the distance and kids larking about and the smell of a fire smouldering, and not being in a talky thinky session indoors, and that ever so slight excitement of having stepped outside the bounds of everyday, and that ever so slightly shocking intimacy of sitting next to other people on the ground all trying to learn something, and the quiet talk that happens when your hands are busy.