Tuesday, April 26, 2011

Mitts for Mother's Day

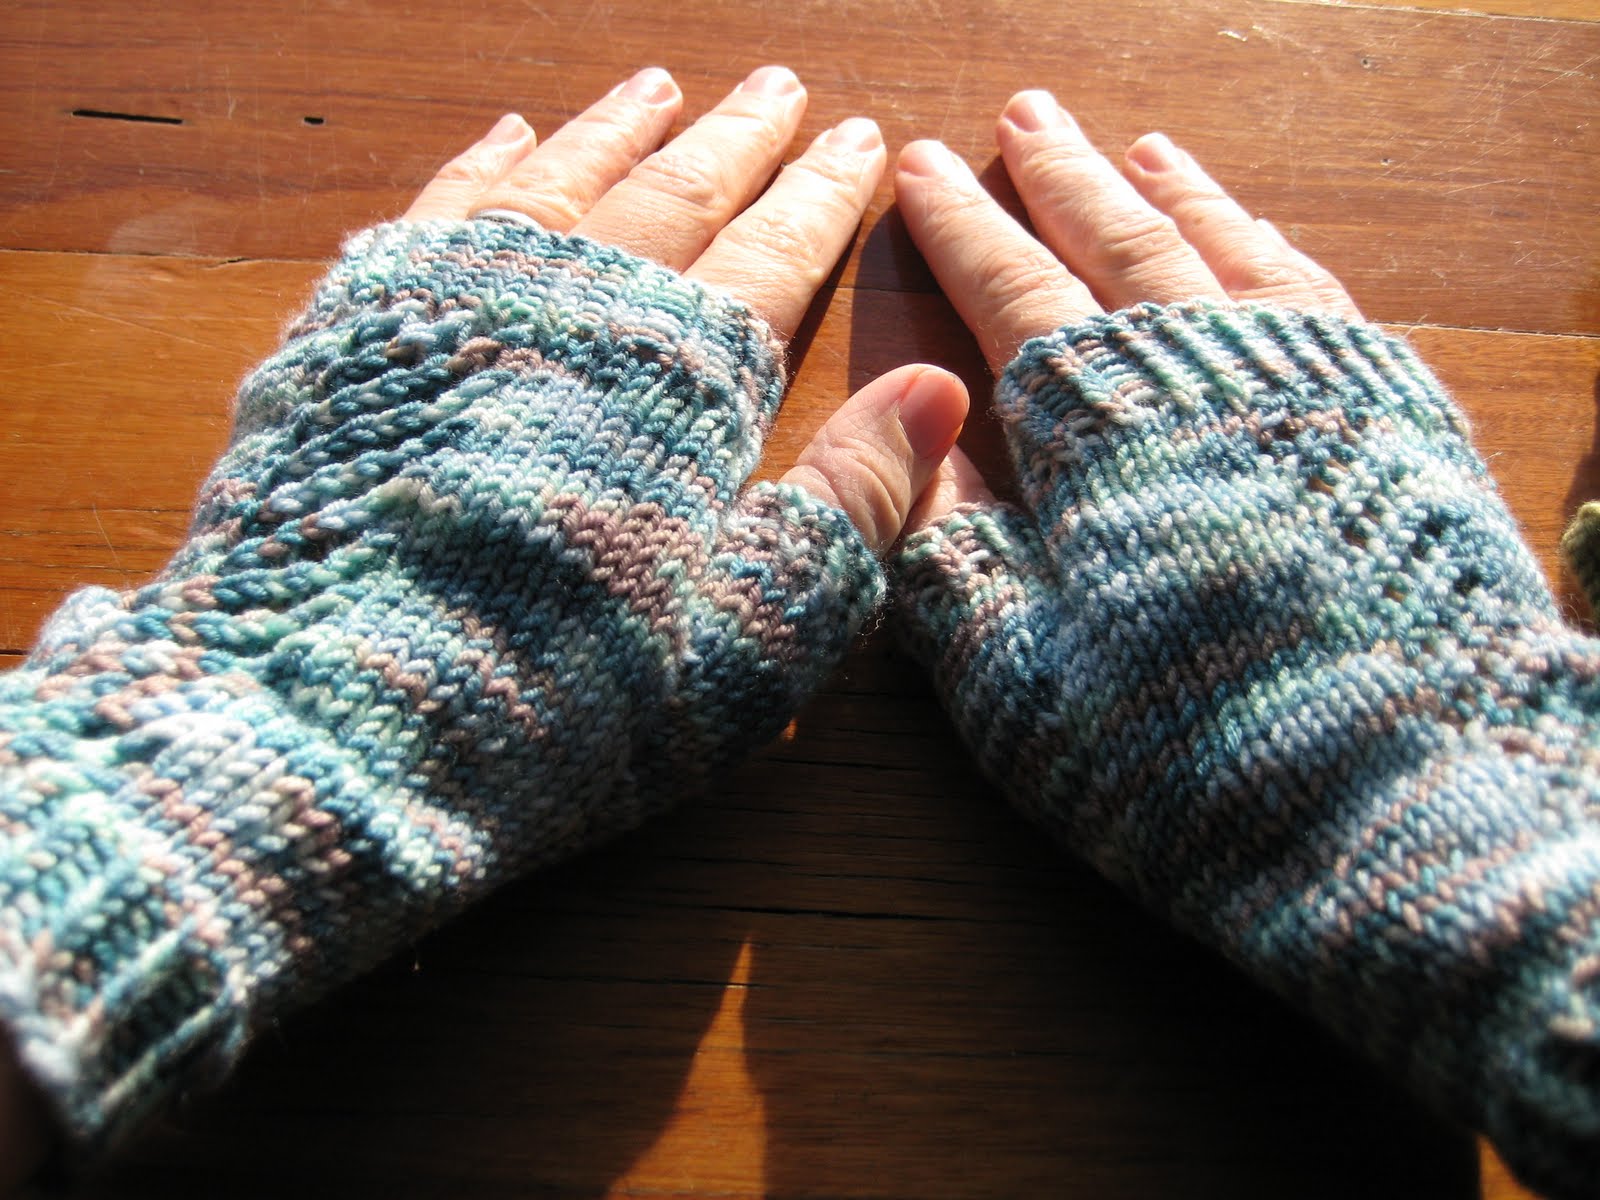
I've made fingerless mittens for both my mum and mother-in-law this year - these strike me as practical for cold weather when you need to actually do things with your hands. Given both these ladies are early birds and spend a bit of time at computers and handling books, and because I know they don't have these already, I decided to knit some mitts for this Mother's Day.

This first pair is for my Mum, using the Susie's Reading Mitts Pattern, and Ravelled here, and the second pair is for my Mother in Law, using the Garden Trellis Mitts pattern, and Ravelled here.

Both these projects have been great for learning new skills - basic lace, knitting fiddly bits with double pointed needles, and new stitches (twisted rib by knitting through back loop, old german cast-on). It's amazing the breadth of knitting (and crochet) tutorials that are now at your fingertips on YouTube and on the internet. Seek and

amigurumi panda

So I've been mucking around with scrap acrylic yarn and a crochet hook a bit lately... I looked in a book I already had and what do you know? there was a pattern there using exactly the same colours I had! black and white. The result: Morris the Sensitive Panda, taken from the book "Meet me at Mike's", collated and edited by Melbourne's Pip Lincoln, which has loads of simple sewing, knitting and crochet projects within. 

(Ravelled here)
It's far from perfect - I should have used a smaller hook, but didn't think I should rush out and add another crochet hook to my collection just yet, being new to the art of it. It's wonky too. And the eyes are just glued on - a big no-no when giving it to kids as they can chew them off and swallow them. However, I think my kids may be old enough to know better.
And the kids seem to love it - Morris has been in hot demand. The nearly 2 year old has been carrying it around all afternoon going "Pandy Pandy!" and trying to feed it "Yummy" crackers. And showing it fish in the fish pond. And the nearly 5 year old made it toy sushi and tea.
This is my first attempt at an amigurumi figure. Very enjoyable and quick! May do more, such as a Totoro, soon - great way to make toys that would otherwise be hard to come by!

Monday, March 21, 2011

chugging to the finish(ed) line...

I'm making a zippered vest for my son, and it has pockets!. I've actually done a lot more than is in this photo. It's a fun project and it's teaching me lots of new skills - shaping arm holes, picking up and knitting, grafting, and generally just making up a garment from pieces - I've mostly knit in one piece in the round so far.

...and this tunic dress for my daughter:
Can't wait to get her in this! I just need to (learn to) crochet some button loops to finish the opening at the front. Part procrastination, part the fact that I need a smaller hook.
Finally, have started knitting my mother some study mitts, for mother's day:

I have done one, and need to do another. Again, this has been a bit of a learning process - learned the 3 needle bind-off, picot edge, and I shortened this when I accidentally made it too long in the wrist.

Sunday, February 06, 2011

Blanketed with love


Well my Wrap with Love blanket is done! I sewed up the last of it two weeks ago and mailed it off. That's it being held up and also draped on my couch to illustrate how nicely it would have blended in to the decor. But it was immensely satisfying to send it off, more so because I think it looked great and I would have been very happy to keep it! Big thanks to Miss Hazel, her neighbours, my Mum, and EcoChic who all knitted / chrocheted squares for the project, and Miss SnapDragon who came over one night and kept me company during the 'stitching up' process*. One of the nice things about Wrap with Love is that they hook in with a really wide range of charities to get them out into the world, and so it could end up anywhere that people need comfort and warmth.

Once it was done I was ever so in love with it, and with the idea of making blankets. I pulled out an old project I'd started when I was 19 or so (eeek, that was a while ago now!), my very first ever knitting project, which was to make a bed-sized blanket out of squares.

A few years back (4!) I pinned them all to a double bed sheet with the help of my mum, and started sewing them into strands. But now I feel inspired to make a few more 'throw rug' size blankets out of them, and maybe even fish through the existing squares to make a few in different colour themes. I was going for jewel tones at the time - purple, dark teal blue, dusky pink; and it's also ended up with dark blue, brown, bright pink, other blues in the mix (other people have pitched in and made squares out of whatever they had). After the WWL blanket I feel more relaxed about colour themes and know that contrast and a bit of joyful mismatch can still look great.

I'm also thinking of how a bit of purposeful contrast dotted through might lift it - the colours seem dark to me these days (living now in the tropical edges of the country here in Sydney rather than my home town of Adelaide where I began this project; which has gloomy bitter winters). So I'm wondering if for example, I might make a purple/ pink one and lift it with some brighter pinks, or arrange a dark blue and brown one but add some turquoise for brightness.

The throw rug appeals because I'll get to slit the colours and play on a few different combinations, but also because it seems less extreme to have a blanket that can be a throw across a bed/ lap rug/ couch rug rather than a whole bed's worth. I was thinking I might keep one and give one to my mum.

Here are pictures of my blanket in progress for me. Note Michael is very excitedly holding the square he knitted over dinner to contribute. He hadn't knitted since he was about 8 but it came back pretty easily.


* As an aside: I notice more and more that I'm not a great 'finisher' - I love starting and dreaming up projects, and getting inputs from a team, but once it comes to the 'stitch it up and send it up' part it can linger for a very long time (especially if that bit is for me to do alone)! Trying to figure out what I can do to help myself get through these bits of projects so that things actually get finished as I know it's a good skill to learn, and satisfying when projects finish and get out of the craft box! Having supportive people joining in seems to help immensely.

Sunday, January 23, 2011

stitched up soon

Sunday morning - a good time to get on the new pushbike that I bought myself as a long overdue kind of Christmas present, and cycle over to Newtown here to pick up some coloured cotton yarn to stitch up the fourth zine. Oh and to grab a coffee, as my housemate has gone camping with the coffee plunger and the little on the stove ones leaks like crazy and makes an exceptionally foul and bitter brew.

I will use green I think, as this zine was a lot to do with growth and change, plus I want every edition to have its own colour so you can tell them apart easily. I guess when I run out of colours it will be a reminder that it's time to move on to a new project!

Saturday, January 22, 2011

Old projects a go go

Meririsa we must be on the same craft-cycle (surely it's like hormones where you can get in sync by hanging out?) I too am grappling with mending and the old lurking unfinished project list.

In the last week I mended a top that was just that little bit split under the arm and had been for months, made definite intentions to mend a very tricky frayed old dress, and most satisfyingly stitched the last bits of the knitted charity blanket I started seasons ago, and sewing in most of the ends. All I need to do now is sew on the tag the charity provides, and send it in to the depot. I must say it's looking rather fabulous on the couch and I am a little tempted to keep it (but wont!) just because it looks so patchy mismatched and cute.

Oh and I just printed volume 3 of my zine, and volume 4, but have only assembled #3 at this stage (it's definitely craft and it's kind of a sewing project because I use hammer, nails and coloured cotton to bind them). In fact just made a new blog to support the zine (hey, somewhat like shoes, a girl can never have too many - right? right??). It's looking plain now but will get embellished in time when I put links and pics in.

Thursday, January 20, 2011

Darn it!

This post will be old-hat for some experienced clothes menders, but I am just learning, as I haven't really needed to do this before.
My mother in law recently fixed up some things for us - the knees of some denim jeans that my little boy had worn through but otherwise fit him fine, plus a t-shirt of mine that I disastrously caught on something and tore the day after I bought it! Darn it!
Finished product - iron-on patch stuck on top of darning. I later hand sewed around the edges to secure the patch, which started coming off not long after it was stuck on.

A closer view of my MIL's handiwork. She kind of wove the cotton in and out in one direction, then perpendicular to it.

These jeans will fit him for a while yet, so that's hopefully a fair bit more wear he will get out of them. This has inspired me to fix up a few other things too, and now that my son is doing things like skidding on his knees on astroturf and real turf, I'm sure the skill will come in handy.

Hubby bought some new shorts and virtually the next day, a rivet that was attached to a front pocket for decoration came off and left a hole around 8mm in diameter! You just can't get quality clothes these days... Shorts instantly looked old!
To darn this small, circular hole, I just stitched around the edges like spokes on a wheel, moving around in a circle. Then I sewed one of the spare buttons over the top on the outside to hide it:

You'd never know there was a hole there!

Elastic waisted skirt

Teddy is modelling it, as real wearer is having her nap.

Ali may recognise the fabric - she gave it to me a few years ago... I realised it was just enough to make my daugher a short skirt (finished, it's about 18mm long, ok for a 12-18 month old). Very snazzy fabric, and not pink too!

Was really simple and quick - cut out a width of fabric 2x her waist, and the desired length plus hem allowances. Sewed the sides together to make a tube. Pressed and sewed the bottom hem, then pressed and sewed a wider waist band, keeping an opening for elastic. Threaded elastic through, and presto! Done.

Options are endless - you could alternate panels of fabric to use up scraps.

Sunday, January 16, 2011

something soft to rest on


Well at Christmas time I decided to make my fella something nice for our soon to be new house. I went to Bird textiles and bought some of their Sydney-designed, hand printed fabric. Bought remnants to sew together patchwork style to make a cushion cover, using nice olive and natural colours that I thought would go with the couch and also the views from the loungeroom which features big gum trees.

What did I learn from this sewing experience, after so long not sewing? (Much like Merririsa below)

- Well, making something with patchwork strips is heaps slower than just using normal slabs of fabric. Hmm, note to self.
- Fabric is remarkable forgiving about non straight seams - everything seemed (no pun intended) to line up ok in the end despite doing it all by eye and not having everything perfectly symmetrical on the grain etc.
- It worked! Finished product looks great I reckon. (Thanks to the fabric)
- Buttons are yet to be attached, oops. Got a bit frightened off the whole button hole cutting step. Must do that this weekend.

Thanks to Miss Snapdragon for her help and technical advice.

Monday, January 10, 2011

Dusting off the sewing machine...

I haven't sewn in eons, yet necessity has forced me to get the old Bernina out and sew up a fitted sheet attached to top sheet thingy for when my son as a rest/nap at his new child care centre, along with a draw-string bag to match. This sort of thing was all included at the old centre, but here you either are given a pattern and sew your own, or fork out $45 for someone to make one for you. There don't appear to be any 2nd-hand ones on offer, and I really didn't want some fabric I had at home to go to waste, so decided I'd have a go at sewing one

Of course, I ended up stuffing up things at the cutting out stage, and freaked out a little, because I thought I'd have to go and buy some fabric after all. However, my dearest better half reminded me that we had lots of old sheets (some of which belonged to a previous bed), and I realised that this was not only an economic solution, but brilliant, as it would save me having to sew 2 hems if I cut the size of sheet I needed from one corner!

So the end product? Not worth taking a photo of, with slightly ugly colour combinations and his name written neatly on the bag in fabric texter, but it's functional and should do the trick. I made a small draw-string bag as a warm up to sewing the sheet set to make sure I could still sew in a straight line (and I could!), and think I might do a few more. One can never have enough when you have kids - for all those little sets of blocks and things that don't have boxes. And I just might make some little elastic waist skirts for my daughter next, now that she is walking well (crawling with a skirt is hardly practical!). Or maybe something a little more adventurous.... I have some baby girl sundress patterns somewhere...

It feels good to be making something, AND using fabric that would otherwise be just sitting in the cupboard.

Thursday, December 09, 2010

Nimble fingers

I have to say I've been finding it easiest lately to knit. It's easy to pick up something and knit for a few minutes, then put it down when the inevitable interruption comes up... "Muuuuum! She's taking my cars!".... "Waaaaaaaaaa!" "Darling - what did you do to your sister?" "NOTHING!!".  You get the picture.

So as I mentioned in my hot water bottle post, I joined Ravelry, and it has been nothing short of a revelation! Loads and loads of ladies (and men) around the world, knitting away, and sharing their work, patterns, their experiences interpreting the patterns, their experiences with certain yarns. There are patterns you can get for free, and there are single patterns that you can buy instead of buying a whole pattern book! An amazing model of IP (intellectual property) sharing, with just about every possibility available! It's a giant stitch and bitch group, available straight from your computer. Given I don't get to see many of the people I know who knit very often, this has accelerated my learning about knitting quite a lot, and I'm trying all sorts of new things.

Is my enthusiasm showing through enough?

One thing I'm short of though is "friends" on Ravelry. So if you're a member (it's free to join), look me up (under the user name "Meririsa") and befriend me!! I'm keen to have more people to share with.

So what have I been knitting? my first garments, for little baby girls! First this one for my little girl in cotton yarn:

...only it's HUGE on her. A lot of lessons learned about different yarn types (cotton vs wool, and different thicknesses) and needles, and getting your test patch right. But anyway, it'll fit in a year or two. I've knitted another one in wool for a dear little girl I know who is about to turn one - I just need to sew in the threads, block, and sew on daisy buttons.

Next up is a little sundress with a knitted cotton bodice and gathered fabric dress.  I hope to take it to my mother in law's and finish it with her while on summer holidays! Then there's a few other projects lined up - vests and tunics for the kids for winter, fingerless mittens for presents for folk in colder climates.... I'll never be idle again!

Sunday, December 05, 2010

Oh you - you're such a card!


So Friday night I ran a card making workshop in the office, at the kitchen table. Around 8 of us (give or take a few visitors) settled in with beer and snacks to craft ourselves some Christmas (or Summer or end of year or other) cards. We used 220 and 250gsm card, in either brown recycled, red, white or buff recycled, along with DL sized enveloped in a lovely soft recycled brown colour.

People got cracking with reusing their year's calendars, drawing, and collaging images. We all did a 'words' focused card to break the ice and get started, and then collaged trees, then using stripes. N got busy with the fabulous stamps that A brought in, stamping up a sustainable storm with images of row houses, bikes and trees - a profusion of cards, a veritable cottage industry of cards. Others used a mix of techniques, and everyone's were wonderfully, distinctly different. It's interesting to see how given the same materials everyone was drawn to different colours, shapes and techniques, and we created such a diverse range of images.

We eventually worked up an appetite, so stopped for takeaway Indian, and then wound up over cups of tea. It was heartening to see people so attached to their creative process, so in the groove that they took bits home to keep making. T even planned to make some more while watching the cricket the next day.

well done craftsters!

and more card pictures...


and lucky last card pictures...


Thursday, November 25, 2010

happy holiday houses


I stayed a night in a lovely quirky holiday house in Brisbane a few weeks ago while up visiting family. Hayley is a friend of my mothers has a series of them that she has done up each in a different theme - she calls them Quirky Cottages and unlike a lot of places they are very kid and pet friendly - as in there are actually ducks and chooks wandering around the gardens, and there are lots of fun details that kids would love. They are not your stock standard high gloss character-less bed and breakfast with mismatched floral bed spreads. Her aesthetic which is very whimsical, a little DIY and lots of fun. She mosaics and ecah one seems to have at least some mosaic - at Lochiel where we stayed there is a whole wall underwater scene with in blues and mirror. She uses a lot of found objects and creative reuse to furnish them.
For example, the photos here are from a multicoloured boat themed house, where even the deck has been made to be pointy like the bow of a ship. These are the kids beds she has, in old row boats. I love also the colourful toys stuck to the wall as decoration. Some ideas there for kids room decorations for the parents out there, inspired me to think outside the box a bit more with decorating living spaces.

Tuesday, October 19, 2010

How do you wash your woollens?

Just wondering, how do others wash their woollens?

I handwash using a little shampoo and tepid water, rinse a couple of times, let it drip in the laundry for a little while to get most of the water out, then air horizontally on my clothes airer.

I have a woollens setting on my front loader washing machine, but have been too scared to try it... does anyone else use their washing machine to wash woollens, and have there been any accidental feltings?

Thursday, October 14, 2010

and another one...

And then I thought while I'm on a roll, I should do a hot water bottle for my daughter, so they'll both have a spunky hot water bottle cover for next winter! Went with red, so thought I might try making up a pattern. I know. So did a 6 stitch x 8 row checker with 2k, 6k, 6p, 6k, 6p, 2k on the knit side, and 28p on the purl side, then switched around the knits and purls in the middle 24 stitches. I think this pattern is even OK when you start to shape the shoulder bits. Here's what I've done so far:

Knitted hot water bottle cover

Not being a very experienced knitter, I've stuck to babies hats knitted on the round, the odd toy and scarves for teddies. I'd rather stick to practical, small knitting projects, and then one day, who knows, I may be able to knit myself the ultimate snuggly cardigan?

One thing that we have needed for a while is a cover for my son's hot water bottle. Because here in Sydney-town, it's not really cold enough for central heating or electric blankets, and a hot water bottle and a blanket usually suffices. But we don't love the feeling of rubber bottles in our bed. We used to use a pillow case, but that wasn't really satisfactory. Then I used the cut off leg of an old pair of my leggings that were about to die, with knots tied at either end of the tube to stop the bottle moving around inside. That always felt a little desperate to me, although my son was fine with it. I thought maybe I could just knit myself one, but I don't really have the skills to make up even such a simple pattern.

Finally, I got a Ravelry account and hunted around for a pattern. I thought Plain and Simple Hot Water Bottle Cover by Amy Pickard sounded achievable. I had to improvise, as I didn't think I had a hope in hell of finding the same yarn. I also searched around my needle stash, most of which are hand-me-downs from my friend Min, and I only had a 6.5 mm set of needles, not 6.0. But anyway, I ended up using Fuel 20 ply wool from Morris, and thought I'd suck it and see. Turns out it was perfect for the pattern.

I was a really quick knit. I would have finished it in 2 days if I didn't run out of wool and have to go back for more. This was also a good pattern to learn a new skill - yo to do button holes!

Here's the finished product, with hot water bottle inside, all finished except I need to raid my button stash and sew on 3 buttons:

Friday, September 24, 2010

spring fling with crafty fun

Thought this might appeal to some:

Crafternoon with Object Gallery

When: 25 & 26 September
Time: 11am – 3pm

Where: Hyde Park North

Bring your craft project out of the closet and come along to a Crafternoon hosted by Object: Australian Centre for Craft and Design, in Hyde Park. Be inspired by some of our most exciting artists, including Denise Litchfield, members of Knitty, Gritty & Loopy, Craft Cartel and Reef Knot, as you work with your own materials. Limited materials will also be available to experiment with.

Tuesday, September 07, 2010

Dress-ups and birthday cakes

Well in this household, June-September is party season, as a lot of kids we know have birthdays during this period.
There were 2 parties recently that required costumes - firstly, a space party, where my son dressed up as an astronaut, and my daughter an alien! Astronaut costume is a grey tracksuit, plus packaging painted white with detail and attached to a back pack to make an oxygen tank thingy, with a helmet made from paper mache moulded from a balloon. Full credit to my husband for making this costume with my son helping. Alien costume was a green dotty tutu plus shrek ears (both purchased).

Birthday cakes - again, made by my husband. One year I will muscle in and do the birthday cakes, but he has done all of my son's birthday cakes so far!! This year, he experimented with roll-out (fondant) icing, which looked really neat. I like how smoothe you can get this icing to look. The 4-year-old got a rocket, and the 1-year-old the moon:

Finally, last week, there was an Arty Party, and our son went as an art critic! Everything was sourced from our own wardrobes - black cap, skivvy, & black pants - the only thing we did was "colour in" black a pair of unused orange kid's sunglasses, and remove the lenses.

What fun!!